Nutty Granola Recipe

nutty granola recipeMommyhood can be a bit overwhelming and tedious to say the least, it’s no wonder we trade personal pampering time for sleep, or that we forget to put mascara on both eyes in the early morning mad rush out the door!

Let’s face it, most day’s in mommyland seem to be filled with sleepless nights, endless house cleaning, unappreciated cooking, school pick-ups, extra-curricular activities, nappy changing, bottom wiping, argument mediating, homework, baths, laundry, stories and bed…did I mention time spent waiting in the car as a taxi driver?

And this is just the basic every day routine!

Most day’s I feel like a train wreck at the end of the day, but today I feel like a super mommy! My to-do list was a little bit longer than normal but somehow I managed to still fit in a whole hour of intense core work training – did I mention short shorts/bikini season is coming up – plus 2 full hours of play in the sun with my munchkins. It’s 9pm and I’m sitting down writing this post as I smell the most gorgeous smell of nutty, cinnamony (I know, I just made up that word:-) granola roasting in the oven! Yum! It reminds me of caramel roasted nuts at a Christmas market.

Nutty Granola Recipe:

8 cups of oats ( I personally like the small and light kind)

1 cup of shredded coconut

1 1/2 cups of whole almonds

2/3 cup of raw brown sugar

2/3 cup of sunflower oil

1/2 cup of coconut oil

1/2 cup of honey

2 tbsp of cinnamon (you can add more or less according to taste)

1 tsp vanilla

Method:

  1. Combine the oats, almonds, shredded coconut and cinnamon in a large baking pan or 2 smaller tins.

  2. Put the coconut oil, sunflower oil, raw brown sugar and honey in a sauce pan and simmer until the sugar melts. Be careful not to boil!

  3. Once melted add the cinnamon and vanilla and pour onto the oats mixture making sure it’s mixed well.

  4. Put the mixture in a pre-heated oven at 150 celsius and leave to bake for about 1 hour. You can choose to leave it in longer if you like it extra crunchy, but remember it will harden as it cools and you may not want your granola tasting like little rocks!

  5. Allow it to cool and then store in a cool little jar.

Who would have thought that all it took was finding the time to make homemade granola to make me feel like a super mommy today!

Finding the time to do that little bit extra on a busy day can seem stressful but it only takes a bit of time management and is totally worth it in the end!

No store bought sugar-filled breakfast cereals for this family, only pure homemade goodness made by my own 2 hands!

xx Lara

Black Turtle Beans With Smoked Sweet Paprika

Back bean and smoked paprikaThe thought of making any bean dish can sometimes seem a bit tedious and time-consuming.  It does take a while to cook these nutrient packed jewels as well as a bit of creativity as far as flavors are concerned, but all is possible! It’s not that far different from cooking a roast. Legumes and pulses are packed with protein and nutrients, they don’t need to be refrigerated, they cost very little, are full of fibre for good digestion, are best yet are extremely friendly on the environment to cultivate.

Activating/Soaking Pulses

To get the most out of your legume or pulse always soak overnight (or longer). This will make them more nutrient dense and easier to digest.  Beans need a good 8-12 hours for soaking, perfect for overnight. If you have a sensitive stomach you can soak them for a few day’s till they sprout before cooking. Just make sure you change the water everyday. You could also cook up a big batch and then freeze in portions to use when ready.

P1060529

Check out the color of those beans…they’re so black they’re purple!!

P1060533Ingredients:

I’ve added a bit of chorizo to this recipe just to give extra flavor, but you can omit it if you’re vegetarian as the sweet smoked paprika gives a delicious meaty flavor. You will need:

  • 500 grams of soaked black turtle beans
  • 3 sweet red peppers (Ramiro)
  • 2 red onions (you can use white onions as well, I’m just obsessed with the red ones:-)
  • 6 cloves of garlic
  • 3 tablespoons of olive oil
  • 2 tablespoons of sweet smoked paprika (smoked has a very different flavor to regular sweet paprika and is what gives this dish its flavor)
  • 50 grams of chopped chorizo (optional if vegetarian)
  • a handful of fresh coriander
  • lemon
  • salt and pepper
  • extra crushed garlic for the end

Method:

Dice the onions, peppers, garlic, and chorizo and gently fry them off in olive oil for about 5 minutes.

black bean 
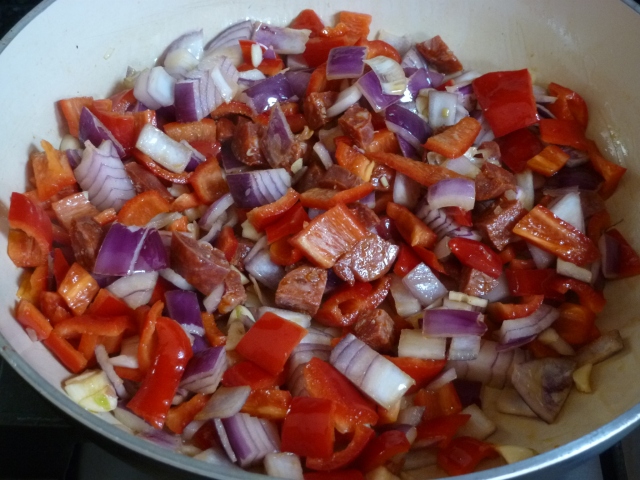
Add the sweet smoked paprika and cook for another minute.

black bean 2Cook your beans in a lot of water for about 1 1/2 hours, topping up with water till cooked.

Once the beans are cooked add your pepper and onion mix and top up the water till it just reaches the top of your bean mix. Cook for another 20 minutes or so.

Note: I like to cook the beans separately for the most part and then mix with the rest, this way the onions and peppers are still a bit crunchy and have more flavour. You can choose to dump them together from the beginning if you want and add a few more fresh onions to it in the end.

Season with salt and pepper. I like to add another 2 cloves of fresh crushed garlic to give it a little kick. Garnish with fresh chopped coriander and a squeeze of lemon and a bit of olive oil. Serve with rice or eat on its own.

xx Lara

P1060560

Christmas Scented Felt Hearts

It’s that time of the year where the shops are filled with a plethora of Christmas ornaments, decadent treats, gifts, and that cozy scent of cinnamon, nutmeg, cloves and sweet oranges, reminding us that Christmas has arrived! I have to admit I’ve gone ornament crazy as there are so many thing I would like for my house. Too many choices – not enough house space 🙂

As with anything I love a little project, and each year I try to add something handmade to my decorations so this year I’ve taken a few idea’s of the things that I’ve seen one of which is this cute little felt heart. As you can tell I love hearts, not that my house is filled with all things heart, except for a lot of love! I started on this project with my 9-year-old daughter as she had a sudden interest in embroidery.

I have these little hearts hanging in my house on the door knobs, in my car, the guest bathroom and my tree!I added some cinnamon and sweet orange essentials oils to the cotton inside, just to give me that Christmas scent wherever I go. I decided they were too sweet to keep to myself so I’ll be giving them as little gifts and thought that I would share with you how simple they are to make in case you are also looking for a little stocking filler for someone special this Christmas.

You will need:

  • A couple of sheets of red and white felt
  • Embroidery needles and thread
  • Scissors
  • Filling or cotton
  • Essential oils (I used cinnamon and sweet orange)

P1060298

Instructions:

Begin by cutting out some heart shapes on paper, then pin them on to your felt this way they won’t slide when cutting. You will need 2 pieces for your felt heart. Once cut take one piece of felt and sew little criss-cross shapes to form a snowflake. You can make them bigger or longer then I did, it’s totally up to your style.

Start to sew a blanket stitch onto the corners following all around leaving a small hole to stuff your cotton into.

Place your cotton inside and drop a couple of  drops of essential oil directly onto the cotton. I put 5 of cinnamon and 5 of sweet orange. You could add more or less. Note: This works best with the red felt as sweet orange tends to slip through and leave a small yellow stain. This doesn’t bother me as it’s hardly noticeable, but if you’re thinking of giving it as a gift just bear this in mind so you’re not disappointed with the final product.

Continue with the blanket stitch all around till the whole is closed and complete with a hoop so that the heart can be hung. And you’re done!

You could present this wonderful gift by hanging it on a bottle of bubbly or just as is – Handmade By You, With Love.

xx Lara

P1060369


Handmade Sweet Potato Gnocchi With Porcini Mushrooms

Handmade Gnocchi

I know the sound of handmade gnocchi sounds tediously daunting, but these moorish morsels are totally worth your while! I won’t lie, it does take a little bit of preparation but in a way it’s a bit therapeutic as you cut and shape each delicate piece. The first time I tried to make them my husband laughed so hard as they totally fell apart when I put them into the boiling water – I was left with a big pot of watery mashed potatoes! Not fun! They’re meant to be light and fluffy…but those were a bit too fluffy.

I was speaking to my mom the other day about how I was doing this post on handmade gnocchi,  remembering the time she taught me how to make them several years ago when I was waiting for baby #2 to make an appearance (nothing like a bit distraction to pass those long moments waiting for labor!) Anyways she told me that when she was young she would religiously make gnocchi every Thursday with her grandma, the excitement of counting how many pieces they had just made was always the fun part. Of course the Italians are known for their love of food so this is a usual practice in many households.I find it very interesting how not too long ago memories were made doing simple things like cooking in the kitchen with grandma. I’m wondering if this is becoming a lost art with all of today’s modern-day conveniences? Are we still taking the time to pass on the traditions of our ancestors or at least form a new solid tradition? Or are we focusing on plastic toys and entertainment and visual stimulation, forgetting the simple things in life?

Every time I go back to Italy for Christmas I enjoy it so much as the whole family, grandparents, uncles, cousins, get together and put out a spread of tasty food! Of course the company is the most important part but it’s great to see cultures and traditions still kept alive. This is something I hope to continue to pass on to my children and their children.

Why Make Gnocchi?

  • It’s tastier then most store-bought kinds.
  • A fun weekend project to include the family in for Sunday lunch.
  • Plays a part in Mindful Eating (more on this subject in a future blog).
  • A healthy way to eat potatoes! (Even more so when its sweet potato)
  • Making your gnocchi by hand can still can fit into a quick 15 minute meal if prepared and frozen in advance to use when ready.

gnocchi sauce board

Ingredients

Makes 4 Servings

For the Gnocchi

  • 1 kg (2.2 lb)sweet potatoes (I used 2 big ones)
  • 260 grams (1 1/3 cups)of flour
  • 1/2 tsp nutmeg
  • salt

For the Sauce

  • 20 dried porcini mushrooms
  • 1/2 cup milk
  • 1/2 cup water
  • garlic
  • 60 grams (1/4 cup) butter
  • 1/2 cup grated parmeggiano

Method & Tips

Before I start here are a few tips & tricks to keep in mind.

  1. Don’t over cook the potatoes as they’ll get water-logged and you may end up with the pot of watery mashed potatoes like I did!
  2. Keep the flour down to a minimum. Just enough to help it stick together but not to the other pieces of gnocchi.
  3. Gnocchi should be light and fluffy as much as possible so the secret is dry (not waterlogged) potatoes and as little flour as possible.
  4. Don’t work the dough too much as this will make them heavy.
  5. You can prepare the gnocchi ahead of time by freezing it first. Just make sure you lay them out separately on a tray and freeze first, once frozen you can put then together in a bag (Cook from frozen – remember this will bring the temperature of the boiling water down so leave a lid on it so it can come to a boil again quickly).
  6. Fresh gnocchi doesn’t store well in the fridge as it will get soggy. It will need to be parboiled first.

To Make the Gnocchi

  1. Start by boiling the sweet potatoes keeping them whole and with the peel on this way they keep flavor and don’t get water-logged. Boil them long enough to be able to put a fork through.

  2. Drain and peel while still hot and grate your potatoes into a bowl creating as much air as possible.

  3. Mix the potatoes gently into your flour/nutmeg/and salt mix and from a soft pastry ball. Remember the secret with gnocchi is to have as little flour as possible this way they’re light and fluffy.

  4. Roll thin threads of the dough out onto a lightly floured surface. Cut them into little cubes and roll onto a fork. This is optional, but it does allow the gnocchi to soak up the juices a bit more.

  5. Put a big pot of water on to boil and add a bit of salt. Once the water starts to boil add your gnocchi one by one. Your gnocchi is ready when it floats to the top.


To Make the Sauce

  1. Soak your porcini mushrooms in the water and milk for at least 20 minutes.

  2. Melt the butter in a pan, add the garlic and sage and saute for about a minute or two.

  3. Add the soaked porcini mushrooms along with the milk and water you soaked it in into the pan with the butter and cook on a low flame for another 2-3 minutes.

  4. Add your cooked gnocchi to the sauce, add the parmeggiano into the pan and let all the flavors cook together for another minute.

All that’s left to do now is serve and enjoy! Doesn’t it taste so much better knowing that you made it yourself? I know it did for me.

xx Lara

Gnocchi


Recipe: Fresh Bulgur Wheat Salad

I’m always looking for some tasty vegetarian recipe’s to add to the weekly dinner table. Vegetarian doesn’t have to seem “boring” or “tasteless”, it’s just about changing the way we think. I believe there is too much focus on meat being the centerpiece of a meal to where our society is consuming far too much, resulting in over production, waste, un-sustainability in future production, not to mention the health hazards such as cancer, high cholesterol, type 2 diabetes,…etc. Of course having a piece of meat on occasion is part of a healthy diet, but we have to remember it’s not the only way to get protein into our diet and when we do eat meat we have to remember we only need a very small amount…about the size of our palm. Healthier sources of protein would include nuts, legumes, fish and chicken.

I know I’m doing my stomach and the environment a favor when I make the conscious decision to add a few vegetarian meals to my weekly dinner menu! The recipe below was enough to fill the stomach of 2 adults and 3 children as a complete meal.

Ingredients:

  • 250 grams of bulgur wheat
  • 2 medium-sized pimento peppers
  • 1/2 cucumber
  • 1 can of chickpeas’ (240 g) or cook yourself
  • 1 small can of corn (150 g) or cooked from frozen
  • handful of fresh coriander
  • 1 lemon
  • 10 fresh mint leaves
  • 1 tbsp cayenne pepper
  • salt & pepper to taste
  • olive oil

Method:

Cook your bulgur wheat according to the instructions on the packet and set aside to cool.

Dice the cucumber and pimento peppers into small cubes. Rinse your corn and chickpeas’ (unless cooking fresh), squeeze the lemon, chop the herbs, and combine all the ingredients into a bowl (I know I didn’t mix it together in the photo above.I was trying to make it look pretty, but I did mix it together before serving:-). Add salt and pepper, and olive oil according to taste. Remember olive oil is our friend and our body needs about 5-6 teaspoons of healthy oil a day!

I hope after trying this dish you’ll agree with me that eating a few vegetarian meals a week is tasty and fun. From the nutty flavor of the bulgur wheat, to the crunch of the cucumber! Add to that the fresh taste of lemon, mint, and coriander, with a gentle kick from the cayenne pepper. Enjoy!

Baking Soda & Cornflour Playdough DIY

Playdough

This playdough is so much fun to make, it’s like a little science experiment as well, my kids and I have such fun with it. I love the way it dries and gives off a subtle pearl shimmer. You can leave it white, add a bit of food coloring, or leave it white and paint it when dry. There are so many fun crafts and shapes you can make with it.

Ingredients:

  • 1 cup of baking soda
  • 1/2 cup of cornflour/cornstarch
  • 1/2 cup water
  • 1 tablespoon sunflower oil
  • food coloring (optional)

Instructions:

Mix all the ingredients into a pot, bring to a simmer stirring constantly until it starts thickening up. Remove off the heat as soon as it looks like mashed potato!

P1040738

P1040744

P1040747


Allow it to cool slightly till you can touch it with your hands. Leave white or add color at this stage.

Time to play!

P1040769

This playdough dries pretty fast so I like to keep it in clingfilm and use as I go. See those tiny little things to the left of the photo? Yep, my cute girls spent hours creating miniature food. A great activity for bringing out creativity!

P1040791

Ice-creams, croissants, bread, cake, fruit bowl, watermelon…there is even a plate of meat and 2 veg! They could play with this all day. The other day they made all sorts of animals.

Of course mommy was also having fun in the workshop, creating and inventing! I like to leave it the original brilliant white, add some texture, some spices to give it an earthy color. But I’ll leave that for another post!

Go on and give this DIY a go…you don’t have to have kids to make this stuff! I’ll show you next time!

Rose Geranium Bath Bomb DIY

Rose Geranium Bath Bombs

Here is a decadent treat for the bath to help you relax, detox and increase circulation, it will leave your skin feeling silky and smooth! The scent is gentle but invigorating with it’s fresh notes of Geranium and Lavender. Fill up your tub with warm water, pop one of these inside, and sink into oblivion watching the petals floating beside you as the oil and scents coat your skin.  Hello Cleopatra!

This recipe is a simple mixture of baking soda, citric acid, and oils. There are many types of bath bombs/fizzes which also include using corn flour and water, as opposed to oil, to hold it together. I personally don’t like the thought of soaking in cornflour for various reasons and I love the moisturizing factor the oil gives to my skin. Once you get the hang of it you can experiment with the essential oils, shapes, and sizes. Remember to use these within 3 months.

Ingredients:

  • 10 tablespoons baking soda
  • 4 tablespoons citric acid (you can find this is your local pharmacy or in an Asian spice shop)
  • 2 tablespoons carrier oil (sunflower, almond, apricot,..etc)
  • 20 drops lavender essential oil
  • 10 drops geranium essential oil
  • dried rose petals or lavender (optional)
  • 2 sterilized bowls, 1 for the wet ingredients and 1 for the dry ingredients (a soak in boiling water will do)
  • silicon muffin tray or bath bomb mold (I use one that has a flower shape because it’s so pretty)
  • gloves

 P1040705Instructions:

Mix the baking soda and citric acid in your bowl. Put the carrier oil and essential oils in the other bowl and stir well to blend oils. Using your glove mix the wet ingredients with the dry ingredients, you should be left with a “wet sand” texture, just enough to hold firm in a ball (just like a sand castle).

bath bomb2Put the flower petals on the bottom of the muffin tray

Bath Bomb and pack mixture in tight. This recipe fills 2 muffin flowers. Your mold may vary.

P1040713Pop out onto a parchment sheet and leave to dry. Best to leave to dry in a cool spot away from moisture.

I like to leave mine  in the mold till dry as I find it easier and less chance of breaking. Find what works best for you. It will also depend on your mold. The most important thing is that it’s away from moisture as it will start to activate if not.

There are so many variations to smells, so use whatever essential oils you prefer. You can also use lavender petals, calendula, or add a bit of surprise glitter in the middle!

These also make a great gift. A time to create and invent cute packaging.

P1040717I hope you have as much fun making them as I do. xxx

3 Reasons to Get Sprouting!

Sprouts

Sprouts are some of the cheapest and very convenient, ” super foods” that are often overlooked by the more flashy “high-fashion” health foods. In relation to vegetables, they are essentially “live” vegetables. Once a vegetable is picked the nutritional value starts to decline, a bean sprout however retains its nutrients until eaten.

Here are 3 Simple Reasons to add sprouts to your Daily Diet:

  1. “Super” food – Sprouts are little living plants, they are alkaline, packed with highly concentrated enzymes, full of minerals and vitamins, and a fantastic rich source of protein. They contain a good amount of fiber, calcium, phosphorous, magnesium and zinc.
  2. Health Benefits –  Bean Sprouts have been used for centuries in the health food department, they are easily digestible and are the true “food supplements”. With all the high vitamin and mineral content they provide a skin anti aging effect, and assist in healthy hair growth. Sprouts do wonders for the intestinal tract relieving the signs of constipation due to their high fiber content. They also provide readily available energy which help fight the signs of mental and physical stress and tiredness.
  3. Economical Way To Get Your Vegetables – Sprouts can be grown all year around providing you with a very economic and convenient way of getting your vegetables. They are easily available to all sections of society all over the world.

DIY Sprouting:

I love growing my own sprouts, it’s so easy and fun and about half the cost of store bought sprouts, so why not! At the moment I’m using a medium sized jar, as it’s practical and takes up no space at all. Here is how I do it!

Step 1: A Jar

I found this very simple and small jar contraption at my local health food store. It’s basically an ordinary jar with a lid full of holes and a stand to hold it up. There are bigger tray containers available on the market as well. And the next step up from that would be a tray with soil. I think the jar is a good place to start, you could even make your own DIY jar –A big jar with a cheese cloth on top fastened down with a rubber band. The important thing when making your own contraption is to make sure you have the jar upside on a slant this way the water can drain out easily.

P1030885

Step 2: Seeds

Now for the important part…the seeds! You can also get your seeds and grains from your local health food store. Alfalfa, mung bean, and sunflowers are a great place to start.

Step 3: Soaking time

Start by putting a tablespoon or 2 of seeds in the jar and let it soak in water for several hours. This wakes these “dormant” super foods up! Fascinating!  I leave mine overnight just to make it simpler. The next morning drain and place upside down and leave it in a nice sunny spot.

Step 4: Rinse daily

All you have to do now is rinse and drain twice a day until they become nice little plants! Depending on your climate this process can take up to 10 day’s.  Once fully sprouted into little plants, store in your fridge.

Step 5: Eat

I love the juicy, crunchy, nutty flavors in sprouts. I put them in sandwiches, stir fries, salads, wraps. It’s best to eat them raw to ensure you get the most nutrients out from them.

Recipe: Lara’s Biscotti (Cantuccini Style)

Here is my take on an Italian biscotti (cookie) called “Cantuccini”. A traditional “twice baked” cookie from the Tuscany region.  They are sweet and simple, and best of all delish especially when accompanied by an espresso! The reason why I said it’s “my take” on the recipe is because I’ll be using the almond meat left over from the Almond Milk tutorial I posted a few weeks back. I hate to throw away anything so I figured this was the perfect use for it!

Lara's Biscotti's

Ingredients:

500 grams all-purpose flour

200 grams almond meat (from almond milk recipe) or 200 grams ground almonds

200 grams brown sugar

4 eggs

50 grams melted butter

1 tsp vanilla extract

1 tsp baking powder

rind of 1 lemon and 1 orange (I love a double dose of citrus flavors!!)

pinch of salt

Method:

Heat the oven to 180 degree’s celsius and prepare a large flat tray with greaseproof paper.

Start by beating the eggs and then add the sugar, melted butter, vanilla and lemon rind.

P1040489

Add the flour, baking powder, salt, and almonds and mix with a wooden spoon into a ball of dough. At some point you may want to get sticky and use your hands!

P1040492

Divide the dough into 4 balls and roll out into long strips, about 30 cm wide. You can make them even smaller if you prefer them more bite size.

P1040493

Bake at 190° C for about 20 minutes. Take them out of the oven and allow them to cool down a bit enough to cut.

P1040257

Slice the long cookie strip diagonally about 1-1-5 cm wide, and place back in the tray to bake for another 15-20 minutes at 150° C. Cool and store in a sealed container.

Cantuccini

For a fun variation try throwing in 100 grams of chopped 70% chocolate. Yum. Enjoy!

Cork Heart DIY

If you’re like me and love collecting “real” corks, then you may be looking for something to make with them. There are so many projects you can make for your house or as gifts, and the deep crimson reds look absolutely gorgeous, vintage, and elegant! I find it amazing how many different colors you get with each cork, no two are the same. I couldn’t wait to get started with this cute little heart, and I love how it turned out. Once finished I hung it on my front door, but you can also hang it anywhere in the house. I believe this is the start of all things cork for me!!!

 You will need:

  • cardboard box
  • scissors/xacto knife
  • strong craft glue/glue gun
  • real cork from red wine (to make my heart I used 68 corks)
  • your choice color of ribbon

P1040479-002Step 1:

In this tutorial I’ll be using basic items that most people have in their cupboards. But if you’re already into crafts then you probably have a glue gun and could possibly skip the cardboard part altogether, as it’s really just to make the heart stronger and a bit easier to work with when you’re putting the shape together.

To begin start by designing your heart shape onto the cardboard making 2 lines of cork.  I started with the outer circle using 36 corks, and then filled in the inner circle with 32 corks. Of course if you don’t have that many corks or want to make it smaller you can use however many you would like.

Quick tip: try to choose corks with a similar size. It will be easier to glue together and will a lot more even.

Step 2:

After you have laid out your heart draw a rough line around it and cut out your heart. If you have a really good pair of scissors then work away with that. I personally found the xacto knife much easier to work with, and had a smoother finish. If you like the look of the cardboard frame then you can make a line right around your heart. I personally didn’t want to see the frame sticking out so I cut my frame just under the width of 2 corks so that it would be as invisible as possible.

Step 3:

Time to get sticky! I used a type of strong PVA craft glue that is white but dries colorless. I put plenty of glue on the bottom of the cork as well as a thin line of glue on each side that touched the next cork. You can also add more glue in the end if you think you missed a bit. Leave it to dry for a good few hours, preferably overnight. This way you don’t get urge to fiddle with it 🙂

P1040478-001

 Step 4:

Choose your choice color of ribbon…I used a crimson raffia which I unraveled and doubled up  as I wanted it to be a bit thicker.

This cute little cork heart is ready to hang! Job done!!